Sisi Koding WordPress : Custom Post dan Custom Fields

Custom Post Type (CPT) dan Custom Fields adalah 2 hal yang menjadikanWordPress sebagai platform yang sangat tangguh dalam dunia perangkat lunak CMS (Content Management System). Memahami keduanya merupakan asset berharga bagi Anda yang ingin terjun ke dunia WordPress Development.

Kita tidak akan membahas tentang apa itu CPT dan Custom Fields karena banyak sekali informasi berserakan di internet,  Anda bisa langsung membaca dokumentasi lengkap mengenai Custom Post Type dan Custom Fields pada WordPress Codex. Sebagai gantinya kita akan membuat Event Manager sederhana yang mungkin akan lebih disempurnakan pada tulisan-tulisan berikutnya.

Sebelum memulainya, siapkan sebuah web WordPress kosong ( fresh install ) dengan theme default ( Twenty Seventeen, atau theme default lainnya jika Anda menginstall WP setelah tulisan ini dibuat ), Anda dapat membuatnya dengan cara ini atau ini. Kita juga membutuhkan plugin-plugin berikut untuk mempercepat proses development :

  1. Custom Post Type UI
    Plugin andalah para developer WordPress untuk membuat custom post dengan mudah dan hemat waktu.
  2. CMB2
    Plugin/Library untuk membuat custom metabox & custom fields,  Anda tidak memerlukan plugin ini jika memiliki plugin Custom Post Type UI Extended.
  3. Code Snippets
    Plugin untuk menulis kode-kode PHP melalui halaman admin WordPress.
  4. Simple Custom CSS and JS
    Cara mudah menulis kode css dan javascript melalu halaman admin.

Sudah siap semua? Saatnya memulai!

Membuat Custom Post Type untuk Event

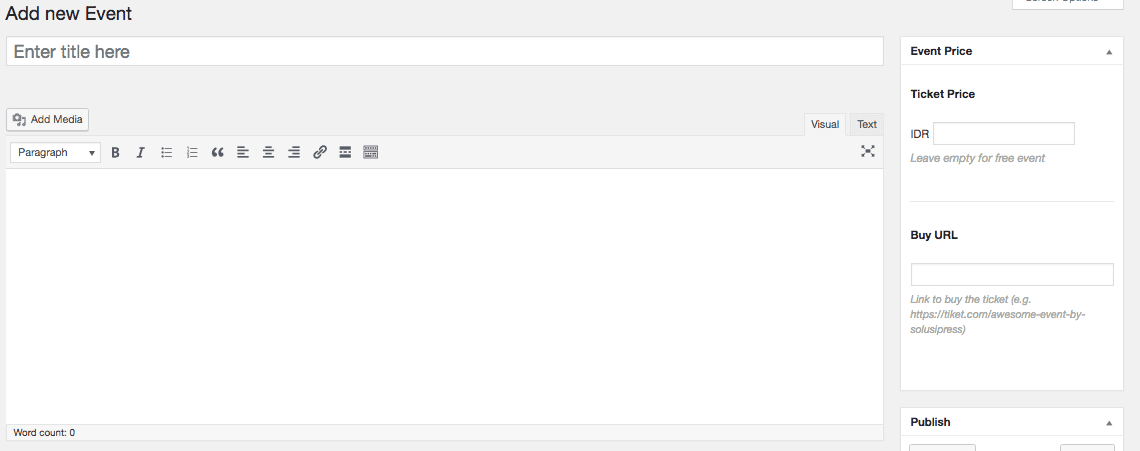
Pastikan plugin Custom Post Type UI sudah terinstall dan diaktivasi, pilih menu CPT UI -> Add/Edit Post Types,  setiap input terdapat keterangan untuk memudahkan pengisian. Untuk saat ini, silahkan isi kolom-kolom berikut:

  • Post Type Slug : event
  • Plural Label : Events
  • Singular Label : Event
  • Menu Position : 6
  • Menu Icon : dashicons-megaphone
  • Show in REST API : false

Inputan lain biarkan sesuai defaultnya, simpan dengan meng-klik tombol "Add Post Type" pada bagian yang paling bawah. Anda akan mendapatkan menu baru seperti pada gambar dibawah.


Menambahkan Simple Grid

Sehubungan theme Twenty Seventeen tidak memiliki grid layout, maka kita perlu menambahkan kode css untuk keperluan ini. Pastikan plugin Simple Custom CSS and JS telah terinstall & teraktivasi. Pilih menu Custom CSS & JS -> Add CSS Code, beri judul Simple Grid, kemudian paste-kan kode css dibawah ini pada bagian code editor.

/**
*** SIMPLE GRID
*** (C) ZACH COLE 2016
*** https://github.com/zachacole/Simple-Grid/blob/master/simple-grid.css
*** modified by SolusiPress
**/
/* ==== GRID SYSTEM ==== */
.container {
width: 90%;
margin-left: auto;
margin-right: auto;
}
.row {
position: relative;
width: 100%;
}
.row [class^="col"] {
float: left;
margin: 0.5rem 2%;
min-height: 0.125rem;
}
.col-1,
.col-2,
.col-3,
.col-4,
.col-5,
.col-6,
.col-7,
.col-8,
.col-9,
.col-10,
.col-11,
.col-12 {
width: 96%;
}
.col-1-sm {
width: 4.33%;
}
.col-2-sm {
width: 12.66%;
}
.col-3-sm {
width: 21%;
}
.col-4-sm {
width: 29.33%;
}
.col-5-sm {
width: 37.66%;
}
.col-6-sm {
width: 46%;
}
.col-7-sm {
width: 54.33%;
}
.col-8-sm {
width: 62.66%;
}
.col-9-sm {
width: 71%;
}
.col-10-sm {
width: 79.33%;
}
.col-11-sm {
width: 87.66%;
}
.col-12-sm {
width: 96%;
}
.row::after {
content: "";
display: table;
clear: both;
}
.hidden-sm {
display: none;
}
@media only screen and (min-width: 33.75em) { /* 540px */
.container {
width: 80%;
}
}
@media only screen and (min-width: 45em) { /* 720px */
.col-1 {
width: 4.33%;
}
.col-2 {
width: 12.66%;
}
.col-3 {
width: 21%;
}
.col-4 {
width: 29.33%;
}
.col-5 {
width: 37.66%;
}
.col-6 {
width: 46%;
}
.col-7 {
width: 54.33%;
}
.col-8 {
width: 62.66%;
}
.col-9 {
width: 71%;
}
.col-10 {
width: 79.33%;
}
.col-11 {
width: 87.66%;
}
.col-12 {
width: 96%;
}
.hidden-sm {
display: block;
}
}
@media only screen and (min-width: 60em) { /* 960px */
.container {
width: 100%;
max-width: 90rem;
}
}
view raw snippet-1.css hosted with ❤ by GitHub

Pada bagian Options, atur sebagai berikut:

  • Linking type: External File
  • Where on page : Header
  • Where in site : In Frontend

Menambahkan Custom Fields pada Event

Idealnya sebuah event memiliki informasi tanggal mulai dan selesai, untuk itu kita perlu membuat custom fields untuk menambahkan inputan-inputan tambahan sesuai kebutuhan.

Pastikan plugin CMB2 dan Code Snippets telah terinstall dan teraktivasi. Pilih menu Snippets -> Add New, beri judul "Event Metaboxes" kemudian paste-kan kode PHP dibawah pada code editor, pilih opsi "Only run in administration area" lalu klik Save Changes and Activate.

<?php
add_action( 'cmb2_admin_init', 'solusipress_event_detail_metaboxes' );
add_action( 'cmb2_admin_init', 'solusipress_event_price_metaboxes' );
function solusipress_event_detail_metaboxes() {
$prefix = '_spevt_';
$cmb = new_cmb2_box( array(
'id' => 'spevt_event_metabox',
'title' => __( 'Event Detail', 'cmb2' ),
'object_types' => array( 'event', ), // Post type
'context' => 'normal',
'priority' => 'high',
'show_names' => true,
) );
$cmb->add_field( array(
'name' => __( 'Start Date/Time', 'cmb2' ),
'id' => $prefix . 'start_date',
'type' => 'text_datetime_timestamp',
) );
$cmb->add_field( array(
'name' => __( 'End Date/Time', 'cmb2' ),
'id' => $prefix . 'end_date',
'type' => 'text_datetime_timestamp',
) );
$group_field_id = $cmb->add_field( array(
'id' => $prefix.'sponsor_group',
'type' => 'group',
'description' => __( 'Sponsors', 'cmb2' ),
'options' => array(
'group_title' => __( 'Sponsor {#}', 'cmb2' ), // since version 1.1.4, {#} gets replaced by row number
'add_button' => __( 'Add Sponsor', 'cmb2' ),
'remove_button' => __( 'Remove Sponsor', 'cmb2' ),
'sortable' => true, // beta
'closed' => false,
),
) );
$cmb->add_group_field( $group_field_id, array(
'name' => 'Company',
'id' => 'company',
'type' => 'text',
) );
$cmb->add_group_field( $group_field_id, array(
'name' => 'Logo',
'description' => 'Upload image file for company logo',
'id' => 'logo',
'type' => 'file',
'options' => array(
'url' => false, // Hide the text input for the url
),
'text' => array(
'add_upload_file_text' => 'Add Image'
),
'query_args' => array(
'type' => array(
'image/jpg',
'image/jpeg',
'image/png',
),
),
'preview_size' => 'large'
) );
$cmb->add_group_field( $group_field_id, array(
'name' => 'Website',
'id' => 'company_url',
'type' => 'text_url',
) );
}
function solusipress_event_price_metaboxes() {
$prefix = '_spevt_';
$cmb = new_cmb2_box( array(
'id' => 'spevt_event_price',
'title' => __( 'Event Price', 'cmb2' ),
'object_types' => array( 'event', ), // Post type
'context' => 'side',
'priority' => 'high',
'show_names' => true, // Show field names on the left
) );
$cmb->add_field( array(
'name' => __( 'Ticket Price', 'cmb2' ),
'desc' => __( 'Leave empty for free event', 'cmb2' ),
'id' => $prefix.'price',
'type' => 'text_money',
'before_field' => 'IDR',
) );
$cmb->add_field( array(
'name' => __( 'Buy URL', 'cmb2' ),
'desc' => __( 'Link to buy the ticket (e.g. https://tiket.com/awesome-event-by-solusipress)', 'cmb2' ),
'id' => $prefix.'buy_url',
'type' => 'text_url',
) );
}
view raw snippet-2.php hosted with ❤ by GitHub

Dokumentasi lengkap CMB2 dapat Anda temukan disini. Jika sudah, buka kembali menu Events -> Add New untuk melihat hasilnya.


Menampilkan Halaman Event

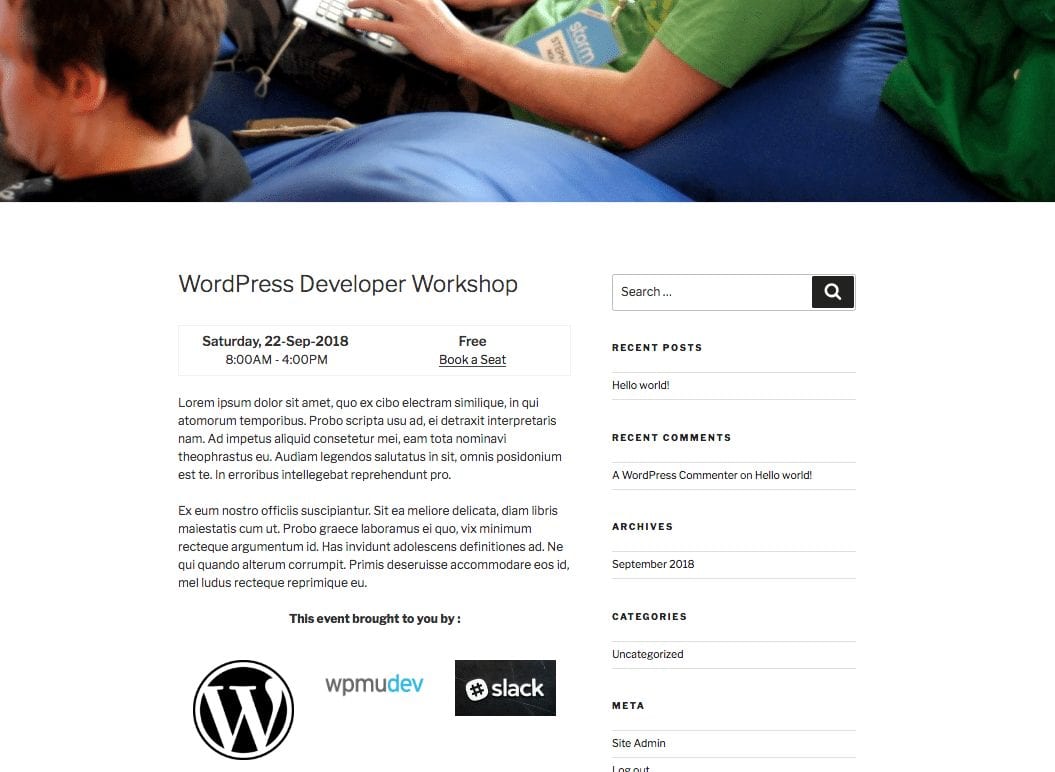
Sebelum menampilkan event, silahkan input form Event sesuai keinginan Anda. Misal seperti gambar dibawah ini.

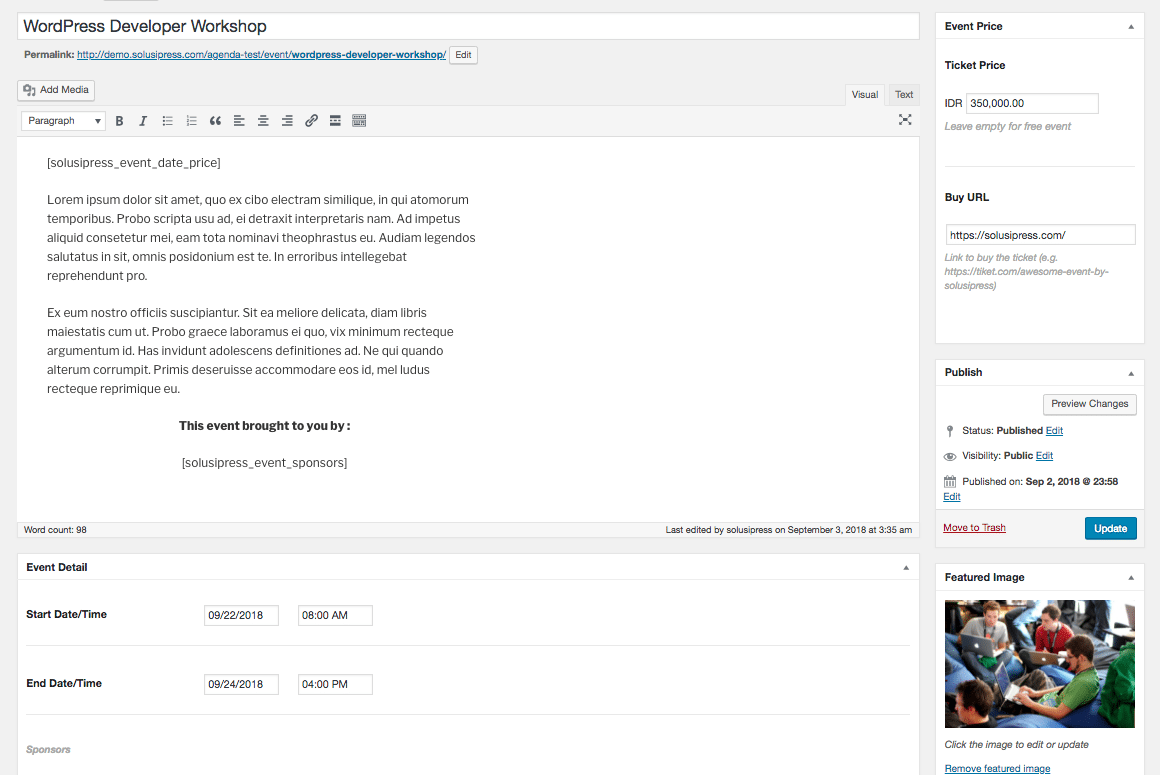
Pada contoh diatas, kita melihat shortcode "solusipress_event_date_price" untuk menampilkan tanggal & harga event dan "solusipress_event_sponsors" untuk menampilkan sponsor. Untuk itu kita perlu menambahkan custom shortcodes.

Buat kembali snippet, beri judul "Event View Shortcodes" kemudian isi kode sebagai berikut

<?php
add_shortcode( 'solusipress_event_date_price', 'solusipress_event_date_price_cb' );
add_shortcode( 'solusipress_event_sponsors', 'solusipress_event_sponsors_cb' );
function solusipress_event_date_price_cb( $atts ) {
$prefix = '_spevt_';
$meta_d1 = get_post_meta( get_the_ID(), $prefix.'start_date', true );
$meta_d2 = get_post_meta( get_the_ID(), $prefix.'end_date', true );
$price = get_post_meta( get_the_ID(), $prefix.'price', true );
$url = get_post_meta( get_the_ID(), $prefix.'buy_url', true );
$html = '';
ob_start(); ?>
<div class="container event-date-price">
<div class="row">
<div class="col-6 date-box">
<?php
$start_date = date( 'Y-m-d H:i:s', $meta_d1 );
$end_date = date( 'Y-m-d H:i:s', $meta_d2 );
$diff = date_diff( date_create( $end_date ), date_create( $start_date ) );
?>
<div class="event the-date">
<span class="the-date-date_start"><?php echo date( 'l, d-M-Y', $meta_d1 ) ?></span>
<?php if( $diff->days > 0 ): ?>
<strong> - </strong> <span class="the-date-date_end"><?php echo date( 'l, d-M-Y', $meta_d2 ) ?></span>
<?php else: ?>
<br><span class="the-date-time_start"><?php echo date( 'g:iA', $meta_d1 ) ?></span> -
<span class="the-date-time_end"><?php echo date( 'g:iA', $meta_d2 ) ?></span>
<?php endif; ?>
</div>
</div>
<div class="col-6 price-box">
<div class="event the-price">
<span class="the-price-rate">IDR <?php echo $price ?></span>
</div>
<a href="<?php echo $url ?>" target="_blank">Get Ticket</a>
</div>
</div>
</div>
<?php
$html = ob_get_contents();
ob_end_clean();
return $html;
}
function solusipress_event_sponsors_cb( $atts ) {
$prefix = '_spevt_';
$entries = get_post_meta( get_the_ID(), $prefix.'sponsor_group', true );
$html = '';
$cols = 3;
$class = 'col-4';
ob_start(); ?>
<div class="container">
<?php $i = 0; foreach ( (array) $entries as $key => $entry ): ?>
<?php
if( $i % $cols == 0 ) {
if( $i > 0 ) echo '</div>';
echo '<div class="row">';
}
?>
<div class="<?php echo $class ?>" style="padding:10px;">
<img src="<?php echo $entry['logo'] ?>">
</div>
<?php $i++; endforeach; ?>
</div>
<?php
$html = ob_get_contents();
ob_end_clean();
return $html;
}
view raw snippet-3.php hosted with ❤ by GitHub

Sebelum menyimpannya, pilih opsi "Only run on site front-end" lalu simpan dengan klik tombol "Save Changes and Activate".

Tambahkan sedikit kode CSS dengan menambahkan kode dibawah ini. Buka kembali menu Custom CSS & JS -> Add Custom CSS, beri judul Event Detail, pilih opsi seperti pada CSS sebelumnya.

.event-date-price {
border: 1px solid #f2f2f2;
margin-top: 10px;
margin-bottom: 25px;
}
.date-box, .price-box {
text-align: center;
}
.event.the-price span,
.the-date-date_start,
.the-date-date_end {
font-size: 110%;
font-weight: 600;
}
view raw snippet-4.css hosted with ❤ by GitHub


Hasil Akhir

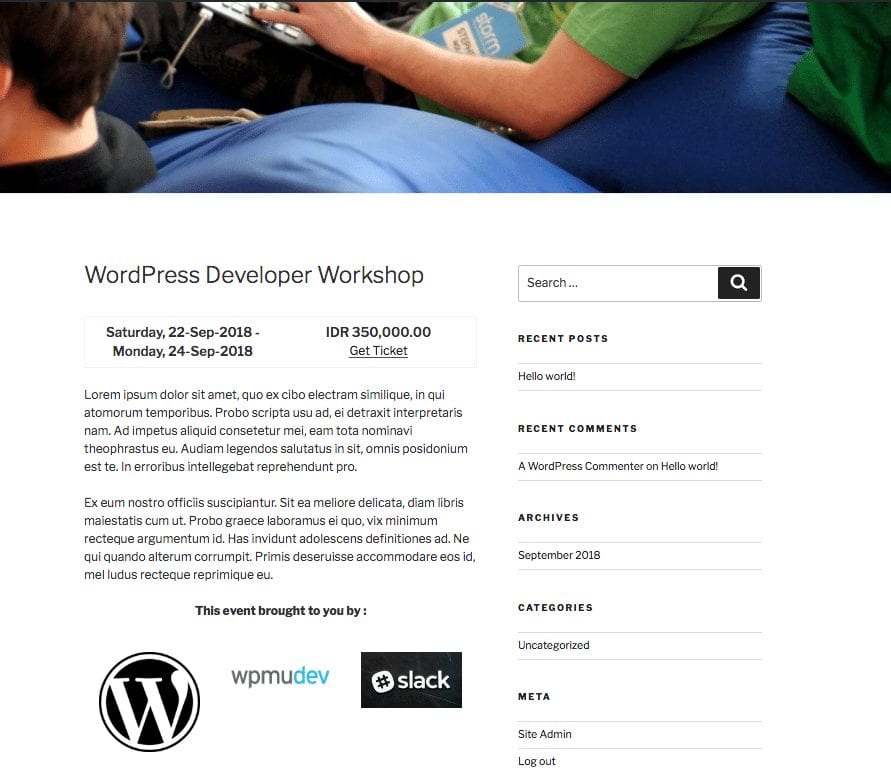
Berikut adalah tampilan final-nya. Anda dapat memolesnya kembali dengan CSS agar lebih menarik dan sesuai dengan selera.

Kesimpulan

Custom Post Type pada dasarnya adalah sebuah objek Post yang memiliki tipe tertentu, Posts, Pages dan Attachments/Media adalah CPT bawaan dari WordPress. Dengan demikian Anda dapat membuat berbagai macam Custom Post sesuai kebutuhan bisnis Anda seperti Properti, Kendaraan ( mobil/motor ), Buku, Film, Musik, Menu Makanan, Paket Wisata, Paket Pernikahan dan lain-lain.

Semoga tulisan ini dapat membuka wawasan Anda lebih dalam mengenai platform WordPress dan jangan ragu untuk mengeksplorasinya.

Happy WordPressing

5 1 vote
Article Rating
Subscribe
Notify of
guest


0 Comments
Inline Feedbacks
View all comments
envelope-otagscalendarwhatsapp
0
Would love your thoughts, please comment.x
()
x